

What Filter On Photoshop To Smooth Skin
If you edit a lot of portraits in Photoshop, you may need to remove a blemish or smooth out facial imperfections every once in a while. The key to successful photo editing is maintaining the natural appearance, and you can do that simply when you go on the original texture of the skin every bit intact equally possible.
In this article, we'll explain how to shine skin in Photoshop without overdoing it.
How to Smooth Skin in Photoshop
To smooth peel in Photoshop, in that location are three common methods. The beginning 2 are pretty straightforward and involve using the Mistiness tool or applying the Mistiness filter for Photoshop face editing. However, neither of these methods are able to retain the original texture of the skin.
The third and more than advanced method sees you lot applying the High Pass Filter, which manages to retain the texture of the skin while adding a silky smoothness to information technology. While it may seem a lilliputian complex at offset, it is really easy once you become the hang of it.
Using the Quick Loftier-End Skin Retouching Technique
Hither's a step-by-footstep guide on how to smooth skin in Photoshop without blurring out important facial details of your bailiwick.
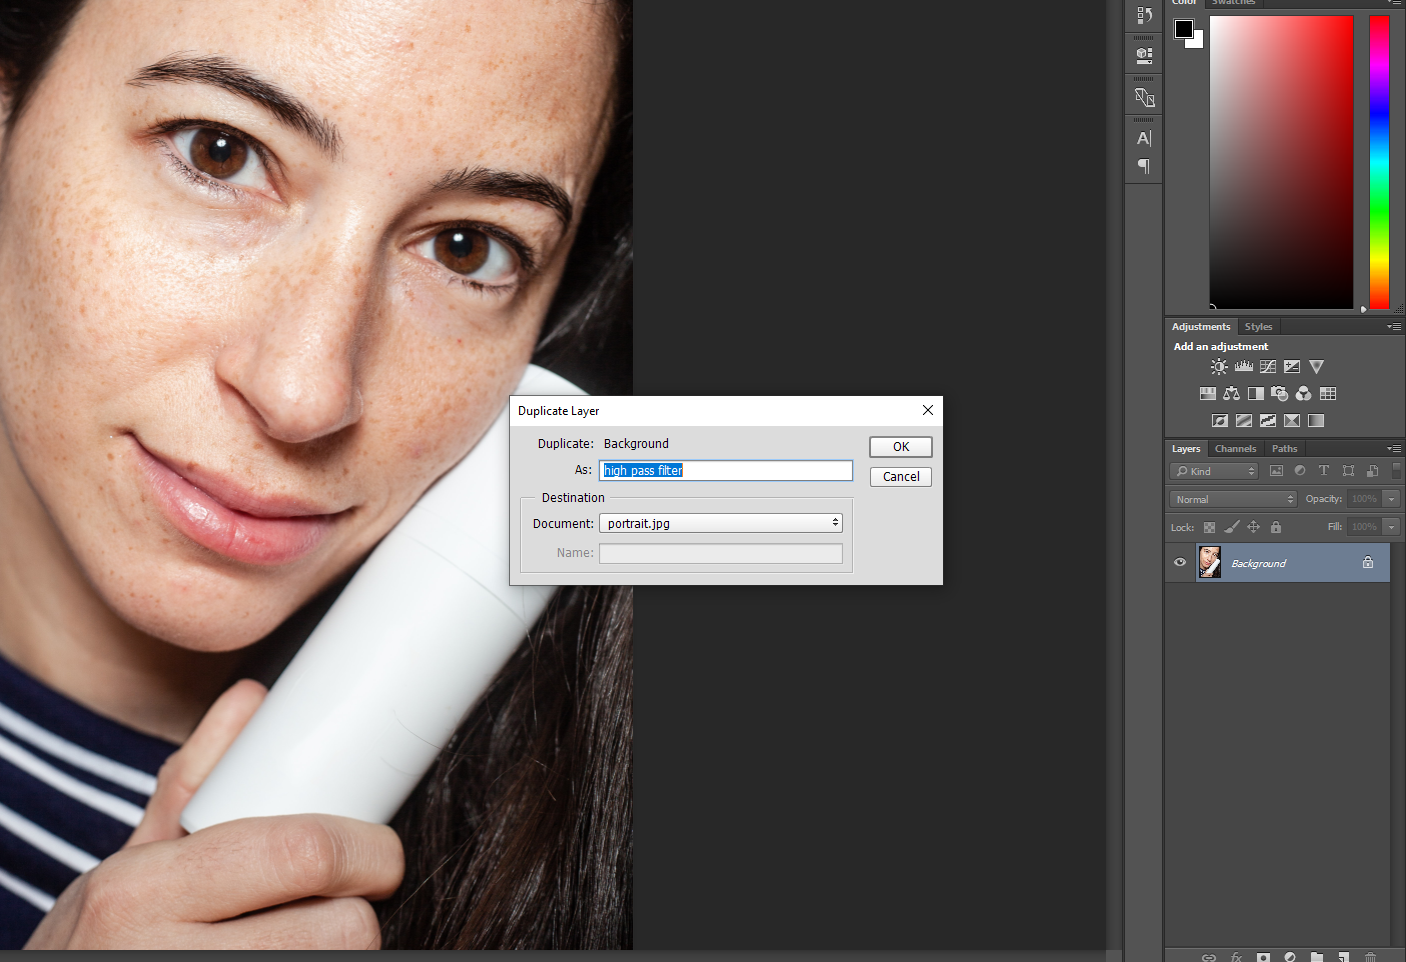
1. Create a Duplicate Layer
Start by right-clicking on the Background layer and choosing Duplicate from the drop-down to make a duplicate layer. We recommend renaming the indistinguishable layer to avert whatsoever confusion.
2. Invert the Image
Next, get to Image > Aligning and click Invert to invert the image entirely. Y'all tin can as well employ the keyboard shortcuts Ctrl+I for Windows and Cmd+I for Mac.
3. Change the Blend Options
In one case done, open the Blending Options Dialog Box by right-clicking the duplicate layer. Change the Alloy Fashion to Brilliant Light. If you're well-versed in Photoshop editing, y'all can besides change the blend mode directly from the layer panels drop-downwardly.
4. Employ the Loftier Laissez passer Filter
Go to the Menu Bar, then select Filter > Other > Loftier Pass Filter to apply it to the flat surfaces of the paradigm. A loftier pass filter helps you detect details and tin can often exist used to sharpen slightly blurry images. Now, go alee and choose a radius.
Whereas a typical portrait shot works best with a radius of 24 pixels, xv-20 pixels piece of work best for depression-resolution pages like the one shown beneath.
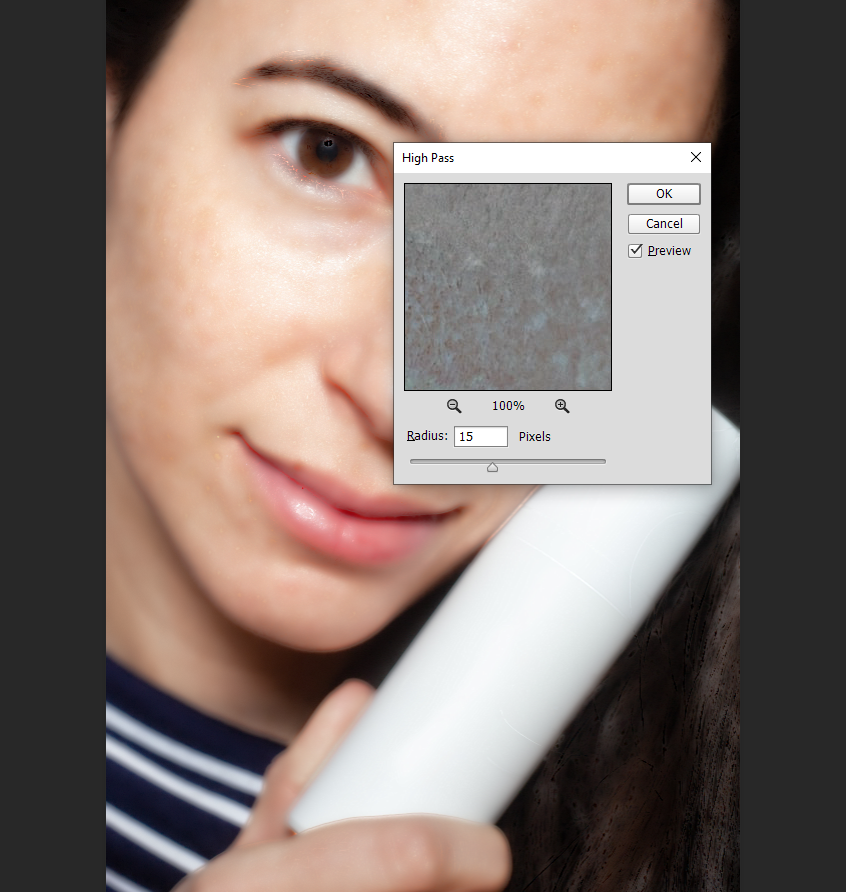
One time you apply the filter, your image will turn grey and the edges of the person's face would be highlighted so that now the outline stands out better.
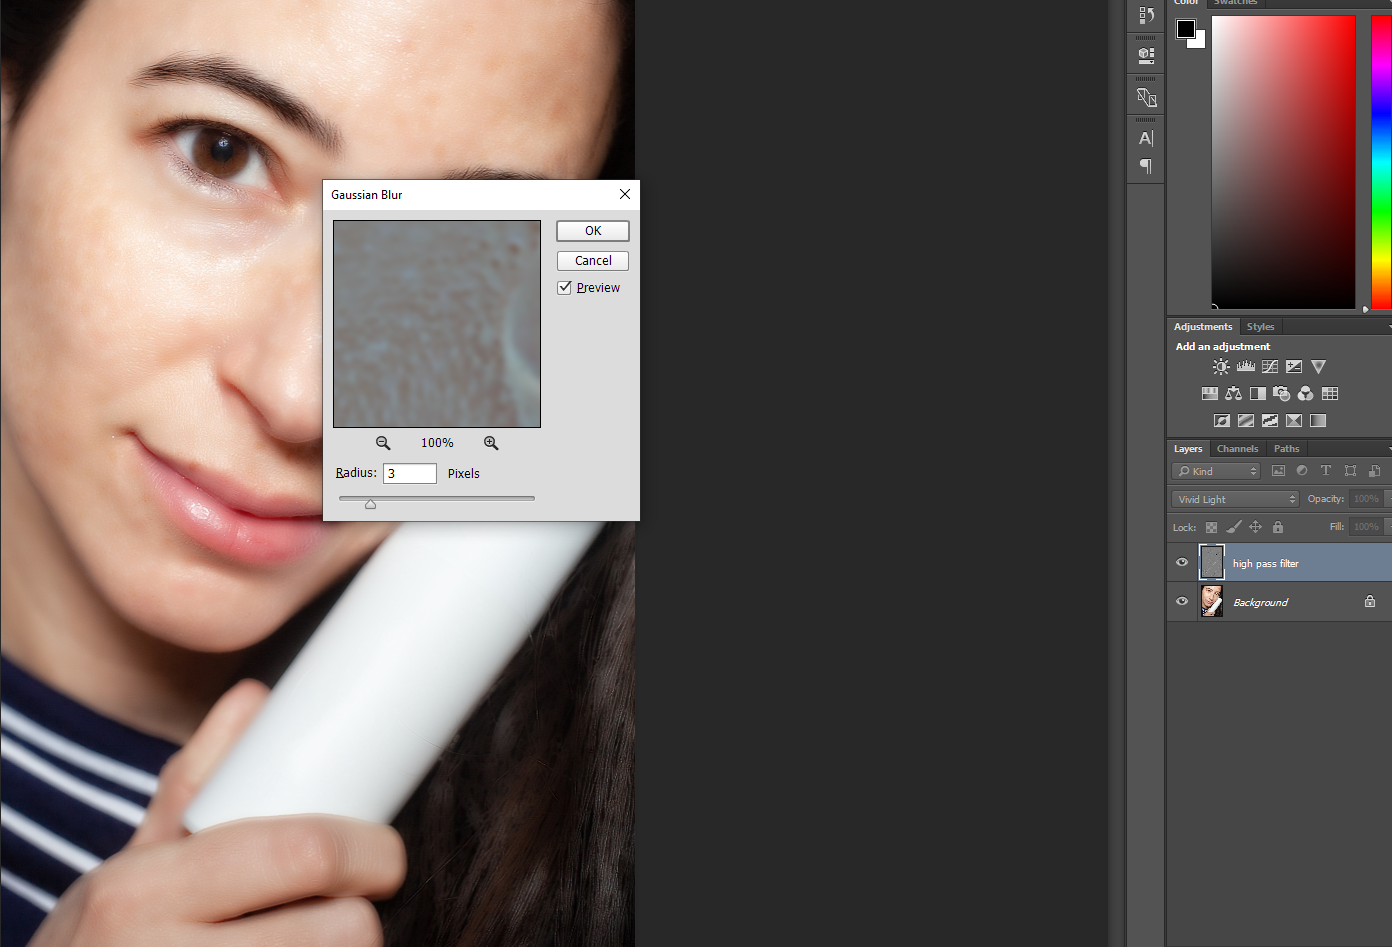
5. Add Gaussian Blur
The Blur tool tin rightfully be called the smoothing tool considering all options to smoothen skin apply the Mistiness filter. However, for the High Pass Filter method, we apply the Gaussian Blur by going to Filter > Mistiness > Gaussian Blur.
Here, you must again choose a radius. This time, choose a radius value between three and four pixels for the best results and click OK. We advise yous zoom in to the image while trying out the radius value, choosing the value that fits best with your image.
For Photoshop face retouching, some professionals go for 1/3rd of the radius value they had opted for the High Pass Filter. In other words, if the radius value of the High Pass Filter was 24, they separate it by three and choose 8 as the radius value of the Gaussian Blur.
Now in one case you've practical the Gaussian Blur filter, you'll notice that it has been practical to the unabridged prototype and not but the skin. It covers the optics, the pilus, and even the clothes. That doesn't wait right, does it?
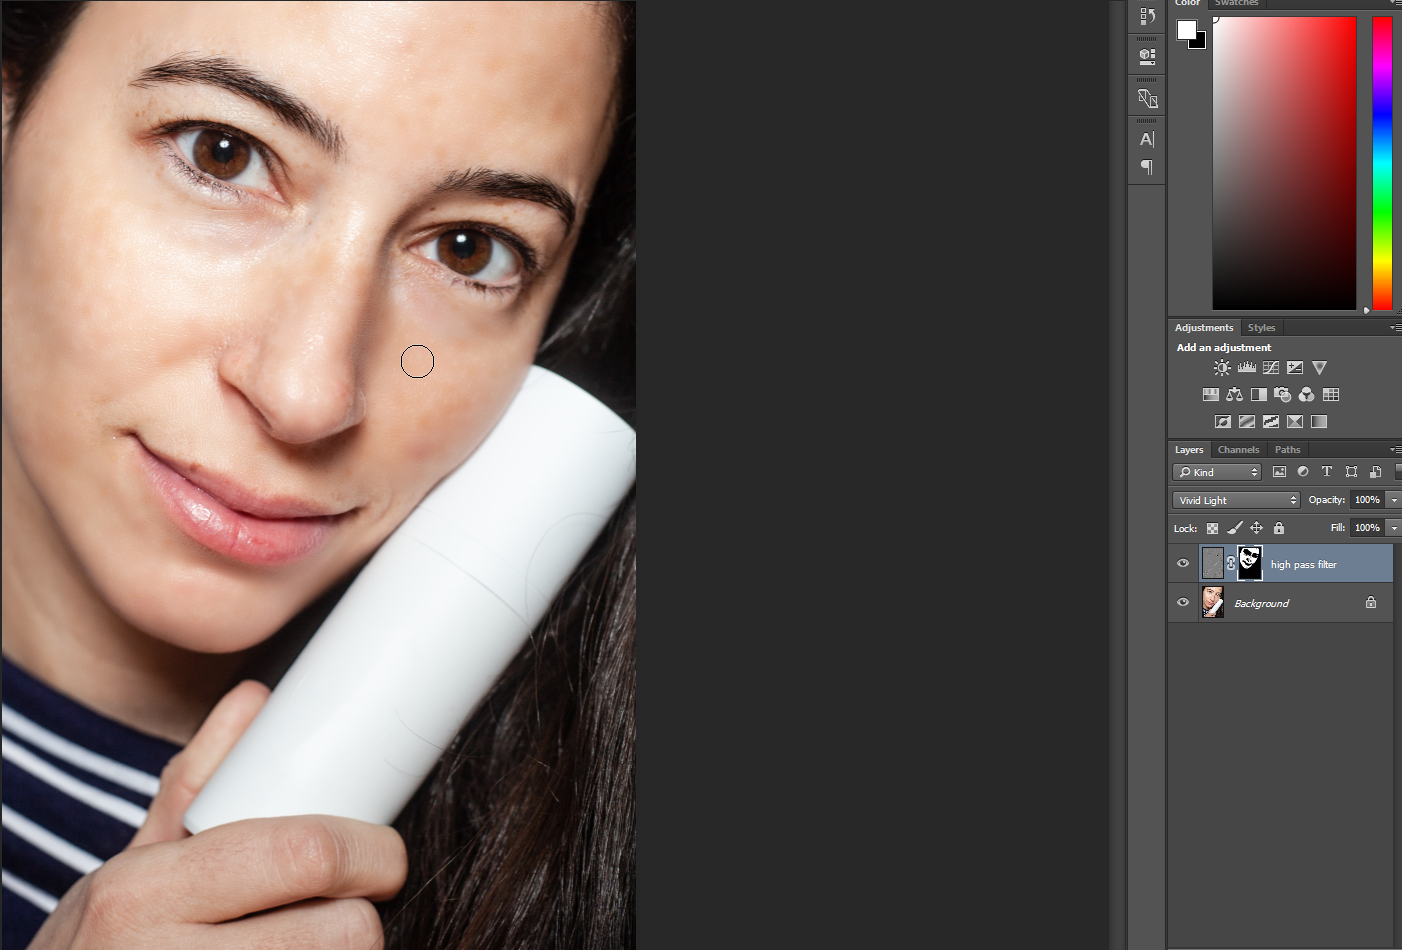
6. Add a Layer Mask to Limit the Blur to the Skin
To limit the blur merely to the skin and utilise it in the right way, printing and agree Alt (Windows) or Option (Mac) and click Add together the Layer Mask icon. This creates a negative mask that hides the smoothing effect from view so that we can paint it dorsum only where it's needed. A black-filled layer thumbnail appears next to our duplicate layer.
7. Select the Peel Brush Photoshop
Next, select the pare brush tool from the toolbar and ensure that the brush colour is gear up to white. If it isn't ready to white, you can press D on your keyboard to reset it to the default colors. You tin can change the brush menstruum co-ordinate to your preference. If you're good with Photoshop, nosotros recommend proceeding at 100 for faster results.
8. Pigment Over the Face
Before yous begin painting, take a quick look and brand sure your Blend Fashion is set to Normal, that the Opacity is 100%, and that the Flow % is set to your chosen value. It is best to employ a soft-border brush to paint over the face.
Press the Shift+left bracket cardinal to make your brush softer, and the Shift+right bracket key to make it harder. You can besides change the brush size from the keyboard using the left and right bracket keys.
Once you lot starting time painting, you'll detect that the smoothing upshot will only appear on the areas you lot paint.
We recommend leaving out areas like optics, lips, and the spots beneath your bailiwick's nostrils for a more natural await. Think to merely paint over areas that need to be softened, and avoid highlights.
Pro Tip: Remove Blemishes Before Smoothening Pare
If your subject's face has a few blemishes you'd like to remove, nosotros recommend you employ the Spot Healing Brush. Information technology is simple, quick, and works similar magic. All you accept to do is click on the blotch and expect. Photoshop will clarify the area, detect good texture from surrounding areas, and apply it to your selected blemish.
For the all-time results, remove blemishes, exercise the initial cleanup, and stop retouching earlier smoothening pare. We say that because smoothening out skin that has blemishes and imperfections will requite your bailiwick's skin an unnatural and weird texture.
NB: While information technology is perfectly alright to remove acne marks or blemishes, be mindful to non remove a person's freckles, moles, or scars. In fact, information technology is all-time to always enquire for consent before retouching someone's skin or removing their imperfections. Sometimes, these little details make a person who they are.
About The Author

Source: https://www.makeuseof.com/how-to-smooth-skin-in-photoshop/
Posted by: albertwomilorge.blogspot.com
0 Response to "What Filter On Photoshop To Smooth Skin"
Post a Comment